
Playing with dolls...

Barbie Transformation Project
It’s a funny thing how inspiration works.  At 54 years old I had no idea I would spend a Saturday playing with Barbie dolls.  In fact, as a child, I spent little time playing with dolls.  That might have had something to do with the fact that we very little money and could not afford real Barbie’s.  The closest thing that I had to a Barbie doll was a plastic doll from the 99 cents store who’s legs where attached with rubber bands (inside of her body) and, well, when the rubber bands broke, which they did within the first week of ownership, all I was left with was a legless lady.
This past week, a friend posted a video about a woman named Sonia who has created some really wonderful little dolls, by wiping off the factory faces of dolls she found in a second hand store and hand painting new faces onto their little heads - ultimately transforming them into a picture of sweet, youthful, purity!  I was inspired!
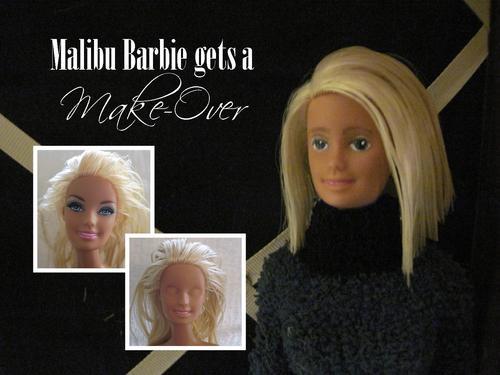
After breakfast on Saturday, I decided I had to pick up a few dolls and give it a try.  The only thing I could find were Barbie Dolls.  Tons, and tons, of Barbie dolls.
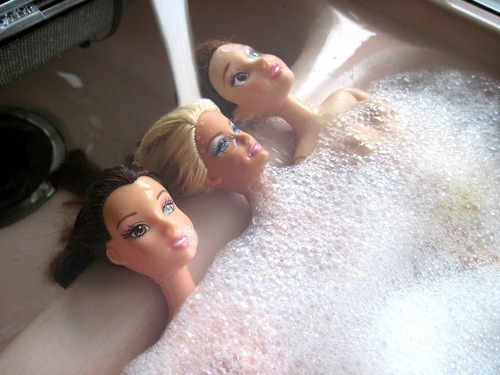
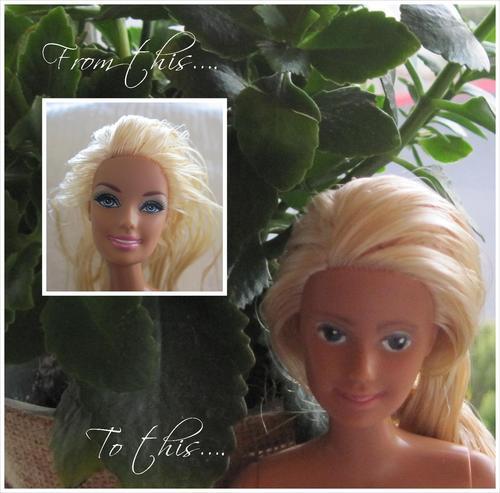
  Step one was a trip to the spa for these ladies!
Followed by an intensive, deep, hair conditioning treatment!   Yikes their hair was a matted mess!
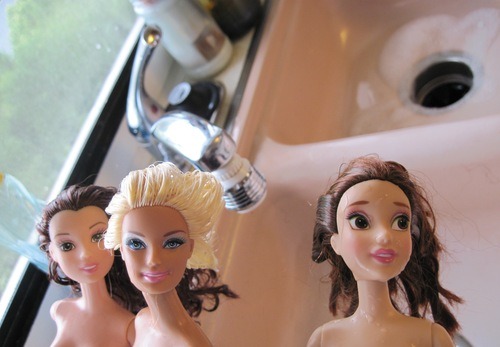
The make-up had to go and with it came their entire facial features!  Of course that was the plan all along, I simply did not let them know that in advance, so that they could enjoy the short lived spa treatment.
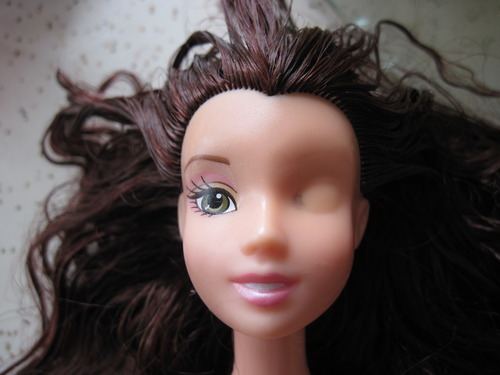
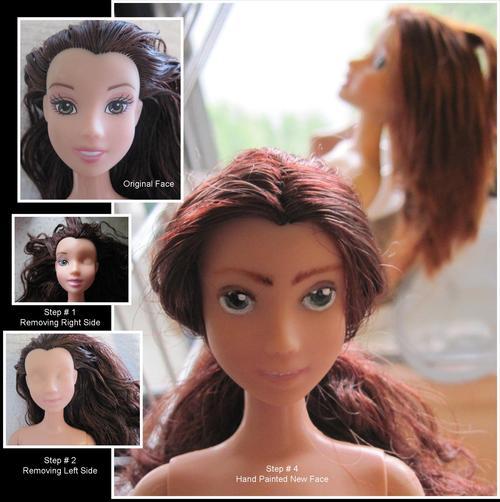
I had viewed Sonia’s video on how to remove the factory faces and with a few modification (I did not have eucalyptus oil) I was able to successfully remove their factory faces.
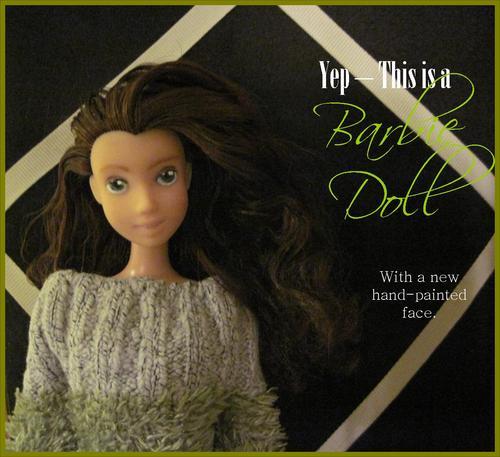
So with a dry, clean slate, I set to the work of transforming them.  I have no intentions of mass-producing a line transformed Barbie dolls. My motivation in posting is to simply share how a little inspiration can  bring such joy into each one of our lives.  Thank You Sonia of http://treechangedolls.tumblr.com/ for the sparkle!

Comments

Cecilia said…
Oh my! They look so sweet! No more over made Barbie...nice!
Dianna Wood said…
Thanks for popping in and for leaving your sweet comment. I bit too much work to do this and re-sale them at an affordable price. But, I would encourage others to do this project as a gift for a special little girl in your life. Head over to your local thrift store and buy a few Barbie's and redo them. Fun! Fun!

Popular posts from this blog

Painted Patio Wall Transformation - Our New "Secret Garden"

Michael and I have discovered a Secret Garden every where we have lived since getting married in 2010.  Whether it was the creek that ran behind our first apartment in Sacramento or the tiny little space of our 520 square foot, 1962 single-wide, mobile home in Rancho Cordova, California, we were always able to discover and create a unique sanctuary to call home.  Even though, in years past, we did what we could to make our surroundings uniquely wonderful, we never had the room to go really crazy until now. Since moving to our new home in North Carolina in May, we have not only discovered a world of exotic creatures and plants outdoors, but we have also started taking full advantage of the additional space we now have available to add our own touch of whimsy to the new "Wood's Secret Garden". Our first major project was the Patio which joins the in-law quarters (where mom lives) to the kitchen entrance into the main house.  We have received so many questions abou

The Project!

So, I had a huge jar of left over glass pebbles--you know the kind that you get at the craft store in those little net bags. I use the flawless ones to make my custom art pendants and rather than throw away the flawed ones, I kept collecting them in a large glass jar hoping someday I would come up with a brilliant idea. Well, here it is! It's a work in progress... Clip I first cut out pages from an old pocket Bible that was falling apart and missing pages. Clip I them spent a good part of a day, decoupaging them to a long section of the hallway wall. Clip Once the decoupage had dried; I began at the bottom of the wall, gluing one glass bead at a time, using (you guessed it) E6000. This process took at least 10 separate, 1 hour sessions. Once I glued about 5 or 6 rows, I used lengths of scotch tape to secure them to the wall and allowed the glue to dry over night before starting another section. Clip This took a really, really, l

Custom Doll Trunk with Doll and tons of clothes and accessories now available!

This took forever!  After transforming the 24 inch Bratz Dolls into "Just K.I.D.S" as part of the campaign to help rescue kids trapped in the sex trafficking industry, I got the crazy idea to convert a vintage suitcase into a doll trunk.  After making the inside compartments and decoupaging and hand painting the entire outside of the suitcase (both front and back) the set is now complete and up for auction on Ebay. Leave a comment if you want to bid on this amazing doll trunk.  You even get to pick which doll you want to be included.